Study Up Before Summer - How to Lay Pavers

Pavers can add great new value and usage to your backyard, your front entrance or garden. Laying pavers this summer will be easier and more affordable if you spend a little time studying the process.
Nine Steps
A patio, walkway or other hardscape feature is more than just a surface of stone. With plenty of time to design your perfect paver project, you can master these nine steps:
- Plan
- Purchase
- Excavate
- Edging
- Build a Foundation
- Install a Setting Bed
- Lay the Pavers
- Fill the Joints
- Seal
Plan
Study your intended site to measure and understand the size, shape and condition of the space. Be careful to account for drainage to keep water running away from your home’s foundation. Watch for underground obstacles, such as gas or sewer pipes, electrical or telephone cables, storage tanks, or buried boulders.
Purchase
Take your design to your landscape supply contractor for additional help. A helpful professional can help select the best pavers for your site, and estimate accurate quantities of crushed stone, setting sand, pavers themselves and stabilizing sand. Arrange for delivery, too, since these heavy materials can overwhelm most passenger vehicles.
Excavate
As you dig away grass and topsoil down to a layer of granular or sandy soil, remember to dig a larger area than the finished paved area. This margin beyond the paved area should be around one to 1.5 times the thickness of the foundation, so if you are putting down 10 cm of crushed stone, your oversized foundation extends 15 cm beyond the finished paving.
Edging
Define the edge of your project with edge restraints to keep pavers and sand from spreading outward over time. This edging can be plastic, wood, or a row of pavers placed at right angles to the pavers forming the main area.
Foundation
Crushed stone in a 0- to 20-mm size is spread over the excavated area, at least 10 cm thick, and vibrated into a strong, compacted base for the setting sand.
Setting Bed
Place two 25-mm pipes some distance apart on the crushed stone foundation, then fill the area with concrete sand to form a smooth, 25-mm thick base into which the pavers will be pressed. Grade the sand to the height of the pipes. Work carefully, as any imperfections in the setting bed will telegraph to the pavers, creating an uneven finished surface.
Pavers
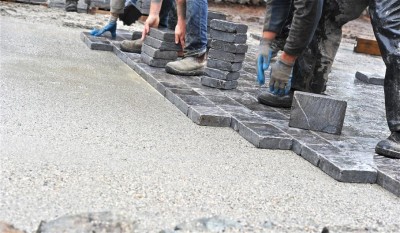
Mix and match pavers from multiple stacks to ensure random color blending. For regular shapes, start in the center of your project area and work outward, avoiding disturbing the setting bed. For bricks and pavers to be laid in fan-shapes, you can start at a short edge and work your way across the area.
Fill the Joints
Use polymer stabilizing sand between the pavers to prevent shifting; sweep this sand in all directions to fill all gaps. Use a vibrating plate to help the sand settle.
Seal
The polymer stabilizing sand and your pavers can be locked into place with a sealer. This also serves to protect the surface and help with water drainage. These are just the broad outlines of laying pavers. To dig a little deeper, contact Legends Landscape Supplies and we can talk you through every step of your hardscaping project.


 LANDSCAPE PROFESSIONALS