

Backyard Remodel On a Budget: Cost-Effective Renovation Tips
Your backyard is an extension of your living space, be it for entertainment, physical activities, or family downtime.
Just like the rooms in your house, your backyard could use a facelift every once in a while, and you don’t always need to set aside big bucks for your backyard remodel!
Read on to discover just how simple it can be to update your greenspace on a budget.
3 Amazing Options for your Backyard Remodel
Your backyard can truly be a one-of-a-kind space, and should be a reflection of your personality and values.
With the right elements, you can take your backyard from drab to fab!
Let’s explore some of the best ways to elevate your backyard this season below.
1. Build a Garden Bed
Whether you’re a flower lover, a vegetable guru, or a landscaping aficionado, installing a garden bed is the first step to getting the most out of your green thumb, and is often considered a priority when planning a backyard remodel.
As you plan your new lush garden paradise, there are a few factors you’ll want to consider.
Choose the Shape and Location of Your Garden
Square or rectangular might fit best, but if your goal is to create an eye-catching accent in your yard, you might want to consider a round, oval, or even a triangular shape.
If you want your new garden bed to follow the flow of your existing greenspace, choose a square or rectangular shape, and install it near a fence or other perimeter.
Or, if you want to draw attention to it, plan a spot away from the boundaries of your backyard. Any shape can be installed here, but a round or oval shape can stand out and add a burst of style.
Triangular garden beds are a great choice for corners, minimizing the amount of real estate you use while still adding an elegant flare to your layout.
Pro Tip: Keep in mind the intended use of your garden bed as you design it. Wind, sun, rain, and shade will affect flowers differently from shrubs, or vegetables differently from fruit.
Choose Your Filler
No, we don’t mean plants. But, you will need to provide specific layers within your garden bed, depending on what you’re growing.
Aggregates
A rocky base material should be incorporated into every garden bed. This layer provides essential drainage so your plants don’t drown.
A multitude of different aggregates are available, from limestone to gravel, crushed stone to pea stone. Try to choose a rocky base that supports the roots of your plants.
Pro Tip: Decorative aggregates are a great way to add some extra personality to your garden beds.
If your backyard remodel includes plants that don’t like mulch, add a layer of beautiful river rocks above your soil instead.
Soil
Soil comes in a variety of types, and what works for one plant may not work for another.
Before choosing any soil for your garden, we recommend researching the plants you’ll be adding to ensure you invest in the proper soil for them to thrive.
One of the most common options for standard plants is a triple-mix soil.
To discover which soil best works for your plants, you’ll want to know if you’re looking for weed control, a balance of sand, silt and clay, and how it should best be stored and cared for.
Mulch
The majority of plants prefer their soil to be topped, providing a safe but eye-pleasing final layer in your garden.
Mulches not only suppress weed growth, but will protect your plants from erosion and guard against temperature swings during changing seasons.
They also add essential nutrients to your soil, while maintaining moisture levels. This combination of much-needed defensive properties will truly boost your green-thumb to professional standards.
Natural or black cedar, as well as pine, are all among the top choices of mulch. Each one can provide a unique colour to your garden bed, adding to your backyard remodel ambiance.
Not sure how much you’ll need?
This handy material calculator lets you input your garden bed properties. Better yet, it can calculate more than just mulch!
Regardless of the aggregate, soil, or other fillers you choose, be sure to figure out how much to buy before you shop.
When it comes time to use your garden bed, you’ll want to consider hardscaping, or integrating stones in your backyard remodel, to avoid damaging your grass when you garden on the regular.
2. Create a Pathway
Stepping stones don’t have to be the whimsical rocks found in fairytale movies. By utilizing the right stones and pavers in your design, you can create a modern but cost-effective backyard remodel feature!
Flagstones
Flagstones are quarried, meaning they’re mined in a specific manner, ensuring they offer a natural flat surface for you to plan a specific use.
Often used in patios, flagstones are considered to be one of the most durable natural stones.
When used in designing your pathway, these stones are a natural landscaping product that can resist wear and tear.
Opt for rockface coping if you want a rustic look to your pathway stones.
Or, choose square-cut flagstones if you’re going for a precise, geometric design.
Alternatively, you can select flagstones that have bullnose coping, meaning rounded edges if you’re aiming for a traditional pattern for your pathway.
Stone Slabs
If you’re picturing a more organic concept for your pathway, consider installing stone slabs.
Due to the typical oversized proportions of traditional stone slabs, each step of your new stone feature will appear robust and intentionally undeveloped.
Flagstones also come in slab formats, but you can look for fieldstone or slate if you prefer a different aesthetic.
Large, flat, and durable: Stone slabs can offer a unique but inexpensive option for any backyard remodel.
Reinforce Your Foundation
Regardless of which stone you choose or the design of your pathway, you’re going to need to make sure to accommodate a stable foundation for your project.
Follow the following simple steps to prepare your stone pathway backyard remodel.
- Dig your path: You’ll need to supply extra room below each stone to allow for proper drainage.
- Install adequate drainage: Crushed stone is most common for this step.
- Support your stones: Bedding sand should be used to level out each slab.
- Design your path: Lay out your stones, adjusting the angle and position until you’re happy.
- Fill in your path: Whether you want to fill your path with cobblestones or grass, complete your path by filling in between your primary stepping stones.
Now that you have installed two beautiful features in your greenspace, you may be considering adding a subtle hue to bring them to life after dark.
Our last budget-friendly tip includes several different lighting options.
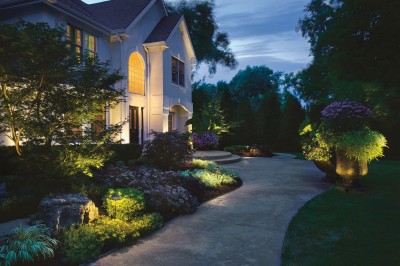
3. Install Lighting
With energy-efficient technologies growing at such a rapid pace, LED lighting is quickly becoming a cost-effective method to rejuvenate your backyard.
By choosing highlight-worthy features within your outdoor living space, you’ll find you only need a few accent LEDs to truly brighten your backyard.
For an easy reference, we will outline the most common outdoor lighting fixtures that you can depend on to truly bring new light to your home.
Spotlights and Floodlights
Outdoor LED spotlights and floodlights come in a variety of options, depending on the application.
Spotlights and floodlights are usually adjustable, so you can really focus your LED lighting on the characteristics you want to call attention to most.
When it comes to installation, these types of lights are most often positioned in or on the ground and then directed at the feature you want to highlight.
By installing a floodlight at the base of a prominent tree, or a series of bushes, you can bring a warm glow to your landscaping.
Or, emphasize the architecture of your home with the installation of several small but powerful spotlights along the foundation.
By choosing select features around your backyard, you can use LED lighting to create dimension in your greenspace.
Sometimes less is more. We recommend starting with just a few spotlights and going from there.
Wall Fixtures and Bollards
Although these two options are installed in very different locations around your yard, we’ve grouped them together because they create the same effect, and you don’t need many to achieve an amazing ambiance.
Wall fixtures, obviously, are mounted on the wall–or any flat, vertical surface. In general, most backyards utilize one or two at most, near the rear entry of the house.
We’re recommending a different approach, using smaller variations in your backyard remodel as accent lighting.
To achieve a softer mood for your backyard perimeter, consider installing compact LED downlights at varying intervals along your fence.
On the other hand, you can install small wall-mounted LEDs along the back tread of your deck stairs.
Not only would you be highlighting the beautiful woodwork leading to your home, but you’ll also enhance the safety of your backyard, limiting any tripping hazards on your stairs when you’re enjoying your greenspace in the late evening.
Bollards are a lesser-known option, but offer a unique solution to a budget-friendly backyard remodel.
A bollard is like a short post, and can be designed to provide a soft 360° glow, or a powerful downlight to focus on the ground below it.
Only a few bollards are needed to create a calming atmosphere in your green space. Consider installing these within clusters of flowers or along the stone pathway winding through your yard.
White or Coloured LEDs
Our final tip is to determine what colour LEDs you should use in your backyard remodel.
White LEDs are considered neutral, and are a popular selection among homeowners.
However, coming in three distinct shades, it’s important to consider which one would best complement your space.
- Warm White LEDs, generally around 3000k for colour temperature, are more on the yellow end of the spectrum.
Choose these if you want a cozy and comfortable glow.
- Cool White LEDs, generally around 5000k for colour temperature, are more on the blue end of the spectrum.
Choose these if you want a crisp, defined look.
- Natural White LEDs, generally around 4000k for colour temperature, are (exactly as you would expect), right in the middle.
Not yellow, and not blue, natural white LEDs offer clear ambient lighting without contrasting against its surroundings.
Coloured LEDs are another option. Red and green are popular choices for the holiday season, but if you want to add a splash of colour year-round, we recommend considering multi-coloured LED fixtures.
These units are referred to as RGB, and can be adjusted to any colour of the rainbow, at any time you please.
Save Money on Your Backyard Remodel by Shopping at Legends Landscape Supply Inc.
Your backyard remodel doesn’t need to be expensive, or complicated. But if you find yourself buried in options, let the experts at Legends Landscape help!
We understand DIY better than anyone! All of our high-quality products are locally sourced.
If you’re looking for something more economically friendly, we carry solutions to meet that need as well.
Visit us to discover a widespread source of professional landscape materials at wholesale price, or contact us today to find out more..
We would love to guide you through the products you need to achieve your vision, or recommend a local contractor who will fit your budget.
 LANDSCAPE PROFESSIONALS